Last updated: September 2026
This page contains affiliate links. If you buy through them, we may earn a commission at no extra cost to you. As an Amazon Associate I earn from qualifying purchases.
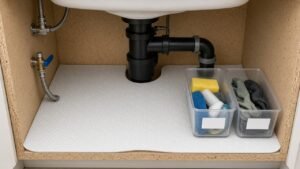
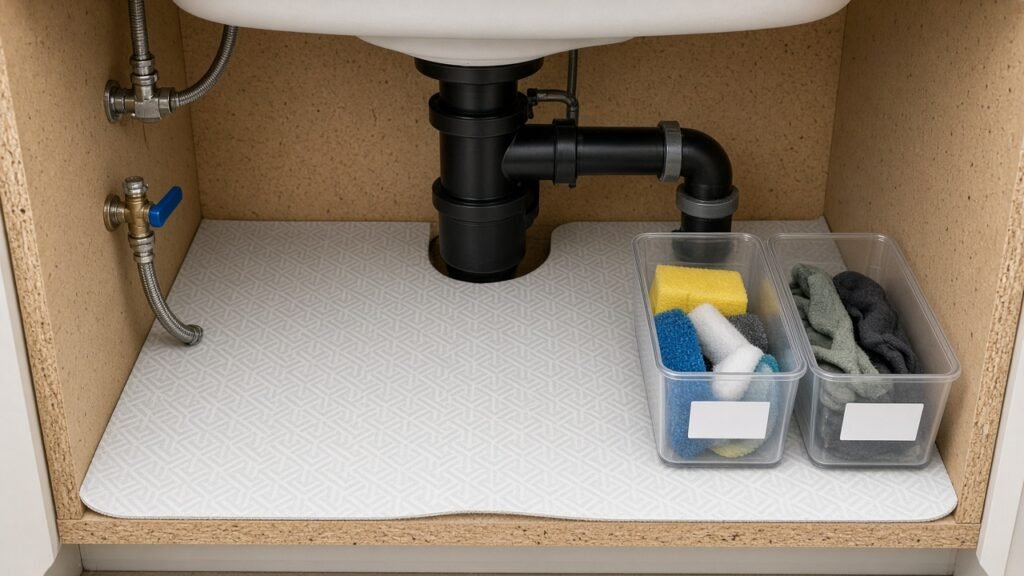
Swollen particle board under a rental sink is one of the fastest ways to lose deposit money. Before you buy a pull-out or L-shaped caddy, lay down protection: an under sink mat liner for renters that catches drips, quiets bottles, and rolls up at move-out.
This roundup covers waterproof mats, trim-to-fit liners, and the bins that sit on top of them—all no-drill, deposit-safe, and move-out ready. Organizers fail when the floor is wet; mats make every other under-sink product work better.
Constraints we optimize for: no drill · deposit-safe · pipe-friendly · small cabinets · move-out ready
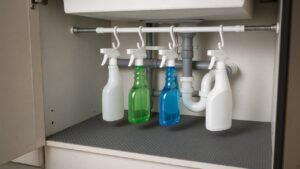
Build the full wet-zone system with our under-sink organizer guide and the tension-rod under-sink method. For the whole-kitchen order of operations, use the weekend reset under $75.
Quick picks: mat + bin stacks
| Your kitchen | Start here | Why |
|---|---|---|
| Every rental (baseline) | Waterproof trim-to-fit mat | Cheap deposit insurance |
| Studio / micro | Mat + clear mini caddy | Tiny footprint; see products fast |
| Center trap / disposal | U-shaped or notched liner + side bins | Leaves plumbing alone |
| Shared flat | Mat + 2 labeled clear caddies | One zone per person |
| Leaky history / old building | Thicker ridged drain mat | Channels water; easier to dry |
| Budget under ~$20 | Single mat first | Add bins on payday |
Why mats matter more than “pretty” organizers
Rental under-sink cabinets are often melamine or particle board. Slow drips from a trap, dishwasher supply, or detergent bottle soak edges you do not see until move-out photos.
A mat:
- Catches drips before wood swells
- Softens bottle noise in thin cabinets
- Defines a clean zone for bins and shelves
- Removes in seconds for leak checks
- Packs flat when you leave
Skip the mat and even a great L-shaped caddy sits on a future problem.
How to choose (5-minute checklist)
1. Measure the usable floor. Width and depth of the cabinet floor, not the door opening only. Note the trap boot position.
2. Pick a shape. Full rectangle you can trim; U-shaped cutout; or two runners for side bays only.
3. Prefer waterproof over decorative fabric. Absorbent-only liners without a waterproof backing can hold water against the board—bad for deposits.
4. Check thickness vs organizer feet. Ultra-plush mats can make pull-out rails sticky; slim waterproof mats play nicer under shelves.
5. Plan removal. You must lift the mat to inspect leaks. Avoid permanent adhesive shelf paper as your only protection.
Category recommendations
1) Trim-to-fit waterproof under-sink mat
Who it’s for: Almost every apartment kitchen—buy this first.
Price band: Under $25
Pros: Cut around pipes; cheap; rolls for moves. Cons: Needs scissors/careful cutting; thin mats can bunch under heavy racks.
Fit notes: Trace the floor on paper first if you are nervous. Leave valves uncovered. Round corners slightly so edges do not peel.
Shop: waterproof under sink mat
2) Ridged / drain-style under-sink mat
Who it’s for: Older buildings, known slow drips, or heavy bottle users.
Price band: ~$15–30
Pros: Channels water toward the front where you see it; sturdier stand for bottles. Cons: Harder to trim; taller ridges may fight some organizer feet.
Fit notes: Still cut or position around the trap. Dry the ridges after any real leak—do not “set and forget” a wet mat.
3) U-shaped or pipe-cutout liners
Who it’s for: Center P-trap or disposal cabinets where a full sheet fights plumbing.
Price band: Under $25 to ~$35
Pros: Designed to hug pipes; less forced cutting. Cons: Orientation (left/right open) must match your plumbing.
Fit notes: Match the open bay to the trap. If the cutout is wrong, a trim-to-fit rectangle is safer than forcing a mismatched U.
4) Clear under-sink bins / caddies (on top of the mat)
Who it’s for: Shared flats and anyone who wants grab-and-go zones.
Price band: Under $25 each; $25–50 for a set
Pros: Modular; clear walls stop mystery bottles; slide out by hand. Cons: Do not span the trap; opaque bins hide expiry dates.
Fit notes: One bin per clear side bay. Measure side width, not full cabinet width. Pair with labels in shared kitchens.
Shop: clear under sink storage bins
5) Slim side-bay bin + mat (disposal kitchens)
Who it’s for: US kitchens where the disposal owns the center.
Price band: Mat under $25 + slim bin $10–25
Pros: Uses leftover strips of floor; stays pipe-friendly. Cons: Low total capacity—add a tension rod for sprays.
6) Absorbent + waterproof layered liners
Who it’s for: People who want drip catch and quiet.
Price band: ~$15–30
Pros: Softens clatter; some wipe clean on top. Cons: Must dry thoroughly after leaks; thicker stack may raise organizers.
Fit notes: If the top layer stays wet, remove and air-dry—do not trap moisture on purpose.
Comparison table
| Category | Best for | Pipe-friendly? | No-drill? | Price band | Move-out |
|---|---|---|---|---|---|
| Trim-to-fit waterproof mat | Baseline all rentals | High (if cut well) | Yes | <$25 | Very high |
| Ridged drain mat | Leak-prone cabinets | High | Yes | $15–30 | Very high |
| U-shaped liner | Center trap / disposal | Very high | Yes | <$25–$35 | Very high |
| Clear caddies / bins | Zones & shared flats | High (side bays) | Yes | <$25–$50 | Very high |
| Slim side bin + mat | Disposal side strip | Very high | Yes | <$25–$45 | Very high |
| Layered absorbent+waterproof | Quiet + catch | High | Yes | $15–30 | High |
Install order (protect, then organize)
- Empty the cabinet; trash expired cleaners.
- Wipe dry; photo any existing damage for your records.
- Place or trim the mat/liner—valves stay accessible.
- Add bins on the mat (side bays).
- Add tension rod for daily sprays if height allows.
- Add shelves/caddies from the under-sink roundup only after the floor is protected.
- Photo the finished zone for move-out.
This sequence matches the weekend kitchen reset wet-zone block.
Measure & cut tips (deposit-safe)
- Mark cutouts with painter’s tape before scissors.
- Cut small—extend the hole gradually; you cannot uncut.
- Keep a 0.5–1″ gap around flexible supply lines so hoses can move.
- Never cover shutoff valves or the trap cleanout path.
- After cutting, vacuum scraps so grit does not scratch the board under the mat.
Bins vs liners vs full organizers
| Need | Use |
|---|---|
| Stop wood damage | Mat / liner |
| Separate shared products | Clear bins |
| Hang sprays | Tension rod |
| Vertical tiers | Expandable shelf / pull-out / L-caddy |
Mats do not replace organizers; organizers do not replace mats. Budget renters should buy the mat even if the fancy pull-out waits a month.
Shop add-ons: under sink cabinet liner · under sink organizer caddy
Material cheat sheet
| Material / style | Pros | Cons | Renter note |
|---|---|---|---|
| Soft waterproof foam/PVC | Easy trim, quiet | Can bunch | Great baseline |
| Ridged rubber | Channels drips | Harder trim | Leak-prone buildings |
| Silicone-ish mats | Wipe clean | Pricey; sizing limited | Good if exact size exists |
| Felt / fabric only | Soft look | Holds water | Avoid as sole liner |
| Adhesive shelf paper | Cheap | Residue / traps damp | Not deposit-smart alone |
When listings say “liner,” read whether the backing is truly waterproof. Soft and pretty is not the same as protective.
Pairing mats with organizers (without wasting money)
- Mat + tension rod: best under-$25 stack for studios.
- Mat + clear bins: best shared-flat stack.
- Mat + L-caddy or expandable shelf: best once pipes are mapped—see the full under-sink roundup.
- Mat alone first: always acceptable; organizers can wait.
If a pull-out’s feet slide on a slick mat, add small non-slip dots under the organizer feet—not screws into the cabinet.
Mistakes to skip
| Mistake | Do this instead |
|---|---|
| Fabric-only liner with no waterproof barrier | Waterproof mat or waterproof-backed liner |
| Burying shutoff valves under plastic | Cutouts + clear access |
| Full-width bin over the trap | Side bins or U-liner |
| Never lifting the mat | Monthly peek for damp spots |
| Adhesive paper as only protection | Removable waterproof mat |
| Skipping the mat to “save money” | Mat is cheaper than deposit deductions |
Shared-flat labeling system (on the mat)
- Mat down as shared base.
- Caddy A / Caddy B labeled by name.
- Shared daily sprays on a tension rod.
- Shared bulk (dishwasher tabs) in a third clear bin.
Personal products do not sit loose on the mat—loose bottles become “community property” and multiply.
Move-out day: leave no trace
- Remove bottles and bins.
- Lift mat; wipe cabinet floor dry.
- Wipe underside of mat; roll and pack.
- Quick photo of clean empty cabinet.
- Take your organizers with you—mats and bins are part of your portable kitchen kit for the next rental.
FAQ
What is the best under sink mat liner for renters?
A trim-to-fit waterproof mat sized to your cabinet floor, cut carefully around the trap, with shutoffs left clear. Add clear side bins if you share the kitchen. Ridged mats help in leak-prone buildings.
Do I need a mat if I already have an organizer?
Yes. Organizers sit on the floor—they do not waterproof it. A mat under freestanding shelves, L-caddies, and bins protects the board and makes wipe-ups easier.
Can I use shelf liner paper instead?
Thin adhesive paper is a weak substitute. Prefer a removable waterproof mat. Adhesive paper can peel, trap moisture, or leave residue—bad for deposits.
How do mats work with pipes and garbage disposals?
Use a U-shaped liner or trim a rectangle so the trap/disposal boot stays free. Put bins only in clear side bays. Combine with the tension-rod method for bottles.
Will this work in UK/AU cupboards?
Yes. Same waterproof-first logic. This page uses US spelling (organizer / apartment / cabinet). UK/AU searches may use organiser, cupboard, and flat—measure in centimetres and keep valves clear the same way.
What should I buy with the mat on a tight budget?
Mat first, then a tension rod + hooks, then one clear caddy. That trio is the core of many under-$75 weekend resets.